Downward Dog: Here’s how to do it!
 © Patrik Giardino

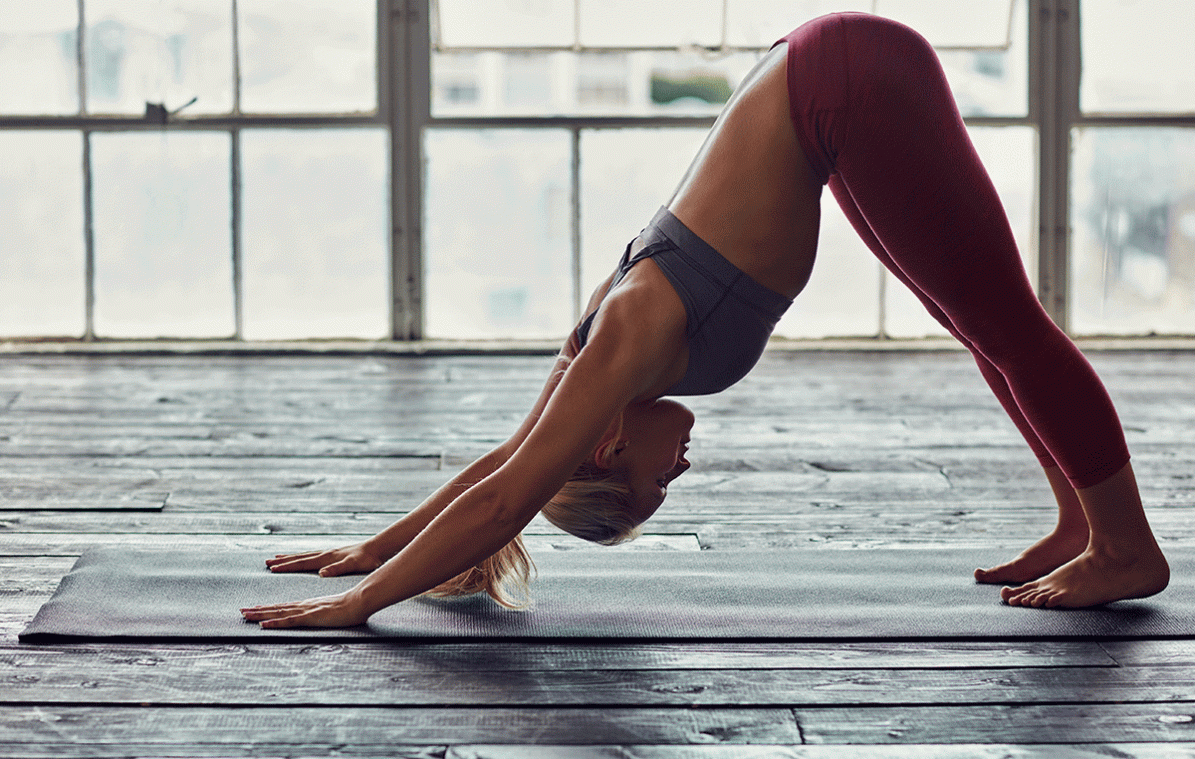
There is no yoga pose more iconic than downward facing dog or Adho Mukha Svanasana. Though it’s extremely common in all different forms of yoga, it’s not always easy to perform. Without proper guidance, it’s easy to make a mistake. Here, you’ll find out all about the basics of this asana, as well as what you should avoid, and our tips for perfecting your posture. Namaste!
Origins of downward facing dog
The name “downward facing dog” is used to describe one of the most common poses (or asanas) in yoga. In Sanskrit (the original language of yoga), it’s called “Adho Mukha Svanasana.”
When in downward dog pose, both your feet and hands are placed on the floor, with hands spaced at shoulder width distance and feet at hip width distance. Looking in a mirror, your body should take the shape of an upside-down V, with your hips at the highest point. This pose is an integral part to almost all yoga classes, and it usually serves as a resting point between more intensive asanas. During a Sun Salutation – the yoga version of a warm up – downward dog is always a part of the sequence.
In downward facing dog, most of your body weight rests on your hands, arms, spine and shoulders. If done incorrectly, the pose could cause injuries over time. It’s also much more difficult to move from downward dog to another asana if there are issues with your form. Correct your yoga mistakes as early as possible, because they’ll be much harder to break once you get into the habit of doing them.
In fact, that’s why it’s worth learning how to perform down dog correctly from the very beginning, even if it’s a bit difficult at first. Don’t compromise any part of your body just to make the position look better. The point of your yoga practice is to feel good, not to win any competitions. Give yourself the time you need to familiarize yourself with new poses. It may take a few months to get fully comfortable with them, but it will be worth it.
Our tip: Staying hydrated is essential for every type of workout – even yoga. Hot drinks such as Tea happen to be especially beneficial to the digestive system.
Downward dog pose: How to do it correctly
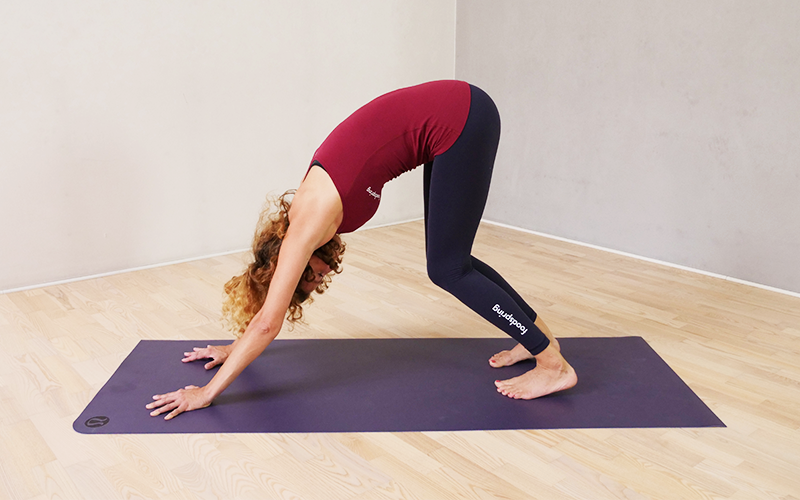
The most important thing to remember when you’re in down dog pose is to keep your back straight. This is what the pose looks like in its deepest form, as performed by yoga teacher Jenny.

13 must-dos for proper down dog posture
- Spread your fingers evenly and keep your middle fingers pointing forward.
- Keep your wrists straight.
- Your hands should be pressed into the ground.
- Your shoulders should be pushed up and away from your ears so that they’re touching in the back.
- Your upper arms should be close to your ears and pointing outward. Pushing your shoulders down will help get here.
- Turn your forearms slightly inward.
- Keep your arms mostly straight, but don’t overextend. Allow your elbows to bend slightly.
- Your head should be in line with your spine, your neck relaxed.
- Your back should remain straight.
- Push your pelvis upwards and tuck it inwards to avoid hollowing your back. Your hips should be as far away from your shoulders as possible.
- Keep your legs straight. If you can’t fully straighten your legs, it’s better to bend them slightly than to curve your back. Your heels don’t need to touch the ground.
- Keep your feet parallel and hips width apart. Your toes should point forward so you can’t see your heels.
- Evenly distribute your body weight between your hands and feet.
Downward facing dog: How to get into the pose
Getting into a downward dog pose correctly is all about where you place your hands and feet. There are 2 different ways to start this pose. Try both varieties and see which one best suits you.
Starting from the plank position
Before doing anything else, put your hands in the right position to begin downward dog. Stretch your legs out to form a plank, keeping your hands underneath your shoulders the whole time. Feel free to move your feet backwards a few inches if that better helps you with the plank.
Shift your arms slightly outward and push your shoulders up and inward so shoulder blades meet in the back. Use your hands to push yourself off the ground. Keep the exact same position, but lift your glutes up and pull your pelvis in. Push your hips upwards and try to straighten your knees and push your heels toward the floor if you can. If you need to, bend your knees to make it easier.
Starting from the child’s pose
Get up on all fours. Place hands under the shoulders and knees under the hips. Make sure to place your hands in the right position now. Use your arms to lift up your toes, push your butt towards your heels. Let your shoulder blades meet in the back. Then, stretch your legs, push your heels toward the floor, and push your butt up. Focus on keeping your spine straight and your lower back in line with your upper back.
Herabschauender Hund – Die häufigsten Fehler
Obwohl der herabschauende Hund eine Basis Asana ist und selbst in Functional Training Classes und Fitness Kursen regelmäßig vorkommt, wird er oft falsch gemacht. Unten im Bild siehst du, wie ein Hund aussehen kann, wenn du verschiedene Fehler kombinierst. Ein Fehler bleibt meist nicht an einer Stelle, sondern beeinflusst deine ganze Haltung negativ.
Beispiel: Verdrehte Handgelenke sorgen für einen anderen Winkel im Ellenbogen. Daraufhin ziehst du die Schultern zu den Ohren, dein Rücken wird rund. Und so weiter.
Wir haben die häufigsten Fehler zusammengefasst und sagen dir, wie du sie vermeidest, damit dein herabschauender Hund nicht so aussieht, wie der auf dem folgenden Foto.
| Mistake: | Wrists are twisted. |
| Here’s how to avoid it: | Spread your fingers and ensure your middle fingers are pointing forward. Turn your forearms slightly inward, keep your elbows slightly bent, and rotate your upper arms outward. |
| Tip: | Uses the edges of your mat to determine if your wrists are straight. |
| Mistake: | Feet move forward to stretch back. |
| Here’s how to avoid it: | Keep your back long, stretch your legs as much as you can, and if you can’t touch the floor with your heels, don’t force yourself. Every time you exhale, try to relax the backs of your legs and stretch them out a little more. |
| Tip: | Get into the plank position first. From there, push yourself backwards into the downward dog pose, lifting your pelvis as high as possible. Bring your thighs closer to your stomach by bending your legs, then stretch out as much as you can. |
| Mistake: | Shoulders are too close to the ears. |
| Here’s how to avoid it: | Rotate your upper arms outward. Bring your shoulder blades down and pull towards your hips. |
| Tip: | Try once while standing: Stand normally with relaxed arms. As you inhale, raise your shoulders towards your ears. As you exhale, let them fall back down away from your ears. This is how your shoulders should be placed in the downward dog, too. |
| Mistake: | Back is rounded and legs are not extended. |
| Here’s how to avoid it: | Leave your hands and feet where they are. Instead of focusing on length, bend the legs and push the pelvis up to the sky. When your back is long, use each exhalation to fall a bit more deeply into the pose. Keep the front of your thighs active. |
| Tip: | Be patient. If your hamstring, shoulder, or back muscles are very strong but not very flexible, it may take several weeks or even months before you can really relax into downward dog with a straight back and straight legs. At the beginning of your practice, pedal the legs and bend your knees back and forth to gently relax the muscles. |
| Mistake: | Upper spine is pushed down and joints are overstretched. |
| Here’s how to avoid it: | Make sure to keep your elbows slightly bent. This activates the arm and shoulder muscles and keeps the neck straight. The head should be located between the upper arms. |
| Tip: | This error usually occurs in yogis who are very flexible or have hypermobility in the shoulder area. Avoid overextending as it can cause joint pain and injury in the long run. |
Form before ego
Feeling comfortable and being able to breathe deeply and evenly are the most important aspects of a good downward facing dog. Even if your legs are not yet straight, your heels are far from the ground, and you feel like you are stretching your back for the first time, know that proper limb alignment and fluid breathing are more important than pose itself.
Give your body time to slowly develop into this new position. If it doesn’t feel good, ask a yoga teacher for advice. They will be able to tell you where the problem is coming from and how it can be fixed.
Relaxation, strength and flexibility in one position
Downward dog can have many positive effects on the body and mind. You’ll find that its benefits extend far beyond your yoga mat and into your daily life. In this pose, you can reset your body and mind, deepen your breathing, align your limbs correctly, and launch yourself into whatever comes next with a clear mind.
Conclusion
Down dog or Adho Mukha Svanasana:
- strengthens the arms, wrists, shoulders and lower back.
- also activates pelvic and leg muscles.
- tightens the hamstring muscles.
- stretches the shoulders and tightens the spine.
- acts against tension and headaches by stretching the thoracic spine and relaxing the neck.
- stimulates the nervous system.
- improves blood flow.
- energizes the entire body.
- calms the flow of thoughts.
- creates a feeling of being grounded.
Sources for this article
We at foodspring use only high-quality sources, including peer-reviewed studies, to support the facts within our articles. Read our editorial policy to learn more about how we fact-check and keep our content accurate, reliable, and trustworthy.
Read more about
Related:

Calculate Your BMI: BMI Calculator & Chart