Glute Bridges: The Best Technique
 ©puhhha

Are you ready for toned legs and a tight rear end? Well, then you should definitely add glute bridges to your training schedule! This exercise will strengthen your whole backside. Best of all, you don’t need any equipment and can do them right at home!
What is a glute bridge?
Glute bridges, also called pelvic lifts, are an exercise for the back of your legs, hips, and gluteal muscles, but they also help strengthen your entire torso. Despite not requiring any equipment, this leg exercise is very effective for your entire lower body. The glute bridge is also very suitable for beginners, as it’s very straightforward and you can do it on a mat at home or at the gym. You’ll notice that even a few repetitions will put a lot of strain on your muscles. So if you’re looking for a leg and glute exercise that will make you sweat, you should definitely give it a try.
Are you getting excited to work out? Our free foodspring Workouts will give you an effective, targeted workout in the comfort of your home. Perfectly suited to your goals and your fitness level. All you have to do is decide which workout to choose!
What muscles does the glute bridge target?
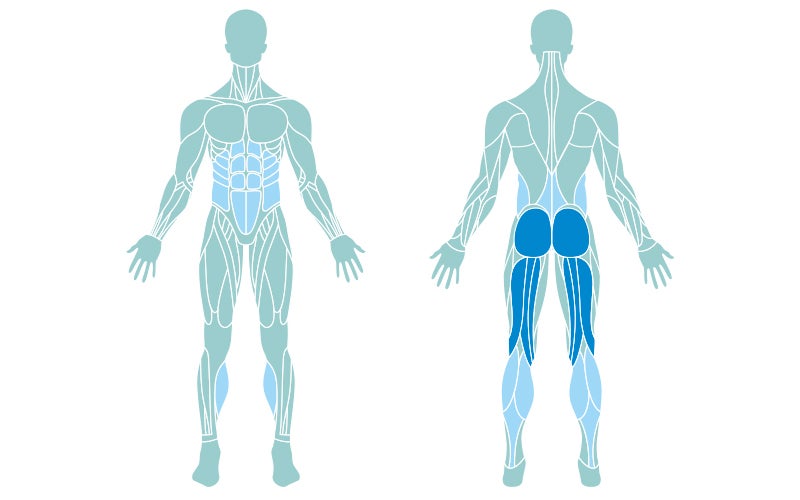
Similar to a squat, a glute bridge works the entire back of your legs and your glutes. Specifically, it fires up your hamstrings and gluteus maximus. But since this isn’t an isolation exercise, it also trains other muscle groups, including your core and abdominals. Strong abdominal muscles are especially important in order to prevent you from arching your lower back when lifting your pelvis. It also trains the calf muscles.
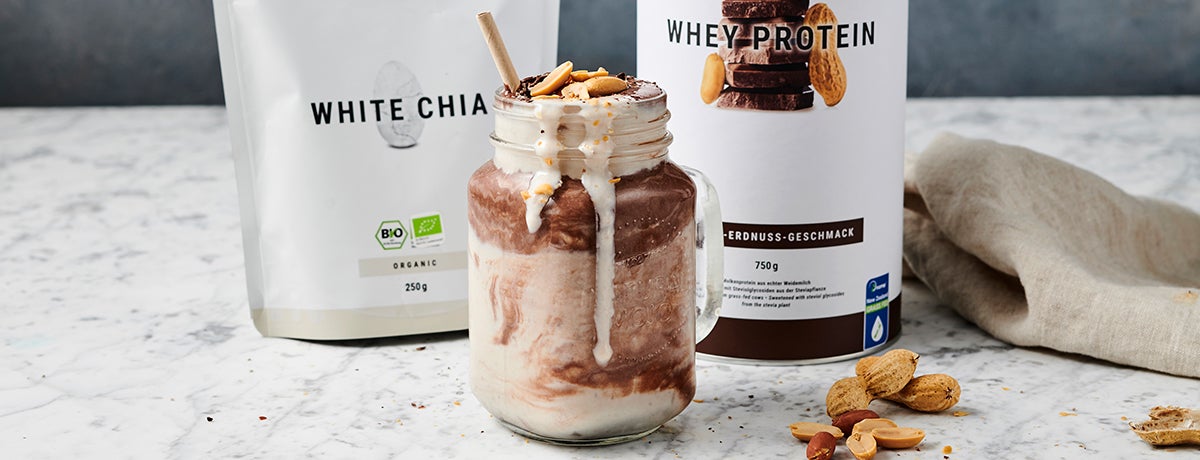
Our tip: Your muscles are mostly protein. That’s why it’s especially important to supply them with sufficient protein after your work out, and a protein shake is ideal for this. With our Whey Protein you can ensure you’re getting high-quality protein packed in a simple shake.
Glute Bridge: Correct technique & execution
To make sure you get the most out of your glute workout, we’ll walk you through what a real glute bridge looks like. All you need for the exercise is a mat and some motivation. If you want a more demanding workout, add some extra weight. This can be a weight plate, a dumbbell, or a water bottle and heavy books. Get creative, the sky’s the limit!
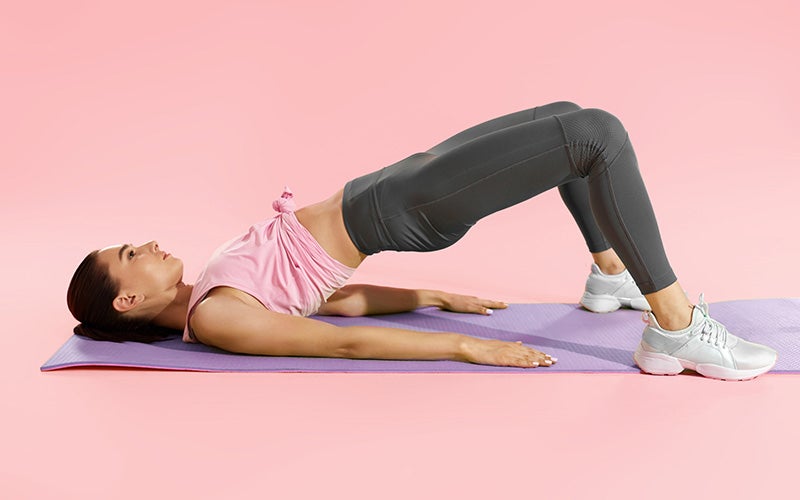
Step 1: Starting position
Lie with your back on your mat, knees bent. Place your feet flat on the mat, hip-width apart, and pull them close enough to you that your calves are directly perpendicular to the floor. Think of your neck as an extension to your spine and lay your head flat on the mat. Keep your arms outstretched on the mat beside your body.
Step 2: Going up
Now squeeze your glutes and lift your hips, lower back, buttocks, and thighs so they form a straight line. In order to fully train the back as well, also lift your shoulder blades slightly. Your knees shouldn’t touch each other during the movement, but also not be too far apart. It’s best to keep a fist-wide distance between your knees. Make sure that you push your glutes upwards out of your leg muscles. Try not to use your arms.
Step 3: Coming down
Hold the position for one second. Then lower to just above the floor. Note: Don’t completely lower your glutes! Then press your pelvis back up. Make sure that you tense your buttocks muscles properly, especially when pushing them up. In order to avoid arching your lower back, it’s important that you also engage your stomach.
Step 4: Repetition
After a few reps, give yourself a short break. If there’s more in you and you’re up for it, grab that extra weight! The technique will stay exactly the same, except that you now have weights. To do this, place the weight on your lower abdomen or hips and hold it with your hands.
Our tip: Do you want to build muscles more efficiently or simply be more defined? In our Muscle Building Guide you’ll find many exercises with descriptions and pictures. In addition, the manual provides you with a training and nutrition plan, so you can reach your goals even faster.
Common mistakes with glute bridges and how to avoid them
As with any exercise, there are a few things to keep in mind with glute bridges. Even if the correct technique takes some time, you should pay attention to correct execution. This is the only way to make sure that you do not hurt yourself and can get the most out of the exercise. To make sure everything goes smoothly, we’ve summarized some tips for the most common mistakes in glute bridges for you:
Breathe properly
Correct breathing is essential for a successful workout (no matter what kind!). Generally speaking: Exhale whenever you are exerting yourself and inhale when it becomes easier again. Accordingly, you inhale as you lift your pelvis and exhale as you lower. Often we breathe the other way round, but you will notice that after a while you will automatically breathe correctly.
Avoid forced breathing
As with any exercise, you should avoid compressing your breathing. We often tend to hold our breath during strenuous exercises. This causes your blood to rush to your head, which can make you lightheaded and dizzy. In addition, it won’t properly supply your muscles with enough oxygen, so make sure you keep breathing as you go into your bridges.
Keep your back straight
The glute bridge is also an effective training for your lower back. Your abdominal muscles must be firmly engaged throughout the exercise. If your abdomen is not engaged, you might end up with a hunched up back during the glute bridge. An easy way to check if you are doing the exercise correctly is to film yourself doing it. This way you can see if your back is in a straight line and, if necessary, correct your arched back.

Keep your head down
During a difficult exercise, we sometimes tend to lift our head off the mat. So make sure that your head is on the floor during the whole exercise. Keep your eyes on the ceiling. That way, you treat your neck as an extension of your spine and the risk of injury is low.
Position your legs hip-width apart
When lifting the pelvis, you may subconsciously cause your knees to fall together. If you turn your toes slightly outwards, your knees will automatically push outwards. So, make sure that in your starting position, you set your feet flat and hip-width apart, and always leave about a fist-wide space between your knees. If you find this difficult, you can wedge a tennis ball or a rolled-up T-shirt between your knees.
Press with your feet
Many people feel glute bridges in their thighs rather than their hamstrings or bottom. If this is the case with you, make sure that you consciously push off with your heels. You can help by slightly lifting your toes off the ground. Your arms should also stay still next to you. If you feel that you are pushing yourself away too much with them, angle your arms at 90 degrees. This will reduce the contact surface so you are less likely to use them to lift.
Training sets and repetitions
The number of training sets and repetitions you do will vary depending on your personal goals. In a training plan for bulking up your muscles, you want to be in the so-called hypertrophy range. That means you should be performing between 8 – 12 repetitions and 3 to 4 sets. If you are simply looking to improve your strength, 3 – 5 repetitions are sufficient. The most important thing here is that you push yourself. In order to really rock your lower body with glute bridges, you should use additional weight.
Glute Bridge Variations/Progression Method
One of our top tips: No matter how demanding your workouts are, after some time your muscles will get used to the strain and you’ll notice that the training feels less strenuous. So before you fall asleep during your glute bridges, you should take it to the next level. Here are three different possibilities for some bridge variations:
Variation 1: Glute bridges with weights
Once you’ve gotten comfortable doing bridges with just your own body weight, it’s time to add some more. If you train in a gym, you might have the choice between a dumbbell, barbell, or weight plate. If you are exercising at home, use any heavy object. This could be a full water bottle, a bag of books, or a heavy cardboard box.
Put the weight on your lower abdomen or hips. In the beginning, the extra weight on your body may be a little uncomfortable. In that case, try putting a towel under the weight. If you have a barbell, you may want to attach a neck pad to the barbell. The execution remains mostly unchanged: Squeeze your glutes and lift your hips, lower back straight. Use your hands to hold the weight.
Variation 2: Single leg glute bridges
Another way to up the difficulty level a little is to do the lift with only one leg. First, place one leg on the other’s thigh or hold it stretched out in the air. Push off with the leg that is standing on the mat. Make sure that your hips remain balanced and does not tip to one side. It’ll become pretty clear that a single leg glute bridge requires a strong core!
Variation 3: Raised glute bridges
To increase the range of movement a little, you can elevate your feet. If you’re exercising at the gym, a tapboard or a bench are suitable. If you’re home, you can put your feet on a box or against the edge of the bed or sofa. Everything else stays the same, and you’ll keep your arms next to your body and yours abs and glutes tight.
Our tip: After a demanding workout, prevent your muscles from getting too sore by supplying them with valuable amino acids. Our Recovery Aminos are a great way to take care of yourself so you can go hard again tomorrow.
Recovery Aminos for quicker recovery
When is it the right time to increase the level of difficulty?
Please keep in mind that you should always choose a higher difficulty level for your exercises only when you are really sure about your form. A flawless technique is essential for getting the results you desire. If you’re unsure, film yourself while exercising so you can better judge how you look and move to a higher training level with confidence.
We also recommend that you always do a few warm-up sets with a low weight or your own body weight first, regardless of your level. Just 1 – 2 sets with 15 – 20 repetitions are sufficient. The warm-up sets are very important. They improve the blood supply to your muscles and mobilize your joints to help prevent injuries. They are also a small warm-up for your central nervous system to prepare for the intensity of the rest of the session.
Our summary
- Glute bridges are an effective exercise for your hamstrings, gluteal muscles, calf and abdominal muscles.
- You can do them at the gym or at home. All you need is a mat and some motivation.
- Keep your back straight and your abdominal muscles engaged to avoid arching your back too much.
- The lift is very versatile and can be easily modified to make it a little more difficult. You can do the glute bridge on one leg or use additional weight.
Sources for this article
We at foodspring use only high-quality sources, including peer-reviewed studies, to support the facts within our articles. Read our editorial policy to learn more about how we fact-check and keep our content accurate, reliable, and trustworthy.
Read more about
Related:
Work Your Core with an Abdominal Wheel